How to transfer artifacts built on Jenkins to Backlog

Backlog Staff
March 10, 2014
As mentioned in the previous post, I love open source and its communities as much as other Nulab developers. I’m an active member of the Japan Jenkins User Group and am here to introduce the Jenkins Backlog plugin that I’m personally maintaining.
Introduction
With this plugin enabled on your Jenkins, when an issue key notation (like BLG-1234) is found in commit messages, it will be automatically converted to a link to an issue in Backlog. You can also log in to Jenkins with your Backlog username and password. For more information on this plugin, you can refer to the plugin page.
In this post, I will share a way to transfer artifacts built on Jenkins to Backlog.
Use case – generating HTML files by Sphinx
The following figure is an example workflow that illustrates how you can get HTML files generated from source text files committed to Backlog’s repository without accessing Jenkins. In this example, the documentation generator Sphinx runs on Jenkins to convert text to HTML.
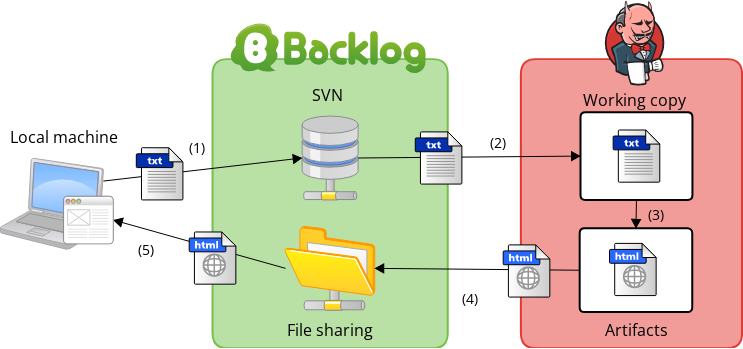
The detailed steps are below:
- Commit files from a local machine
- Checkout/update the committed files on Jenkins
- Generate HTML files by Sphinx
- Transfer the generated files to Backlog file sharing
- Look at the transferred HTML files in a web browser
Jenkins and my plugin automatically do steps 2 – 4, and as you can see in the figure, you don’t have to access Jenkins to get artifacts from Jenkins.
With this architecture, you can keep your Jenkins running in a private environment even when sharing its artifacts.
This works whether or not you’re using SaaS like CloudBees or running your Jenkins in a public environment. Because most Jenkins users run their Jenkins in a private environment with restricted access, it’s not easy to share artifacts from Jenkins with those who cannot access Jenkins. My plugin solves this problem and makes it easy to share artifacts from Jenkins with everyone on the project because they can access Backlog without special settings.
Configuration of Jenkins
First, input the Backlog project URL, user ID, and password.

Then, add an action named ‘Publish Files to Backlog’ in the ‘Post-build Actions’ section. Since Jenkins provides detailed help, I will only add complementary information in red balloons to the following capture.
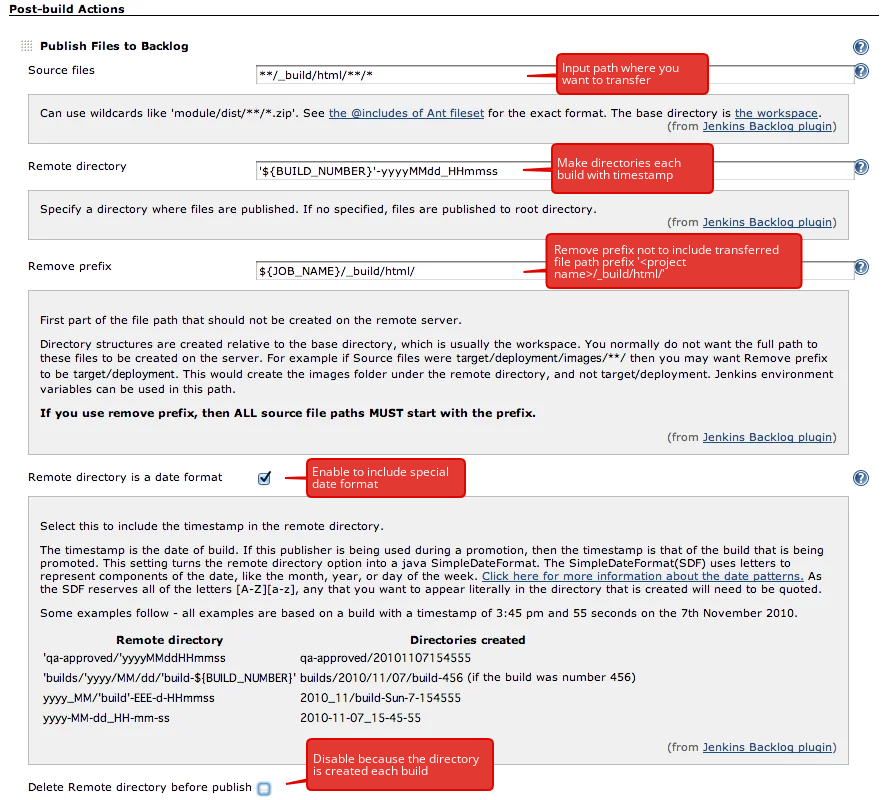
Policy of saving artifacts
There are two policies when saving artifacts:
- Save only the latest artifacts
- Save all version’s artifacts
If you choose the former policy, you should enable ‘Delete Remote directory before publish’ to be sure that the artifacts are generated with the latest build. If you choose the latter, you should enable ‘Remote directory is a date format’. In addition, you should set a date format like ‘yyyyMMdd ‘ or an environmental variable provided by Jenkins ‘${ BUILD_NUMBER}’.
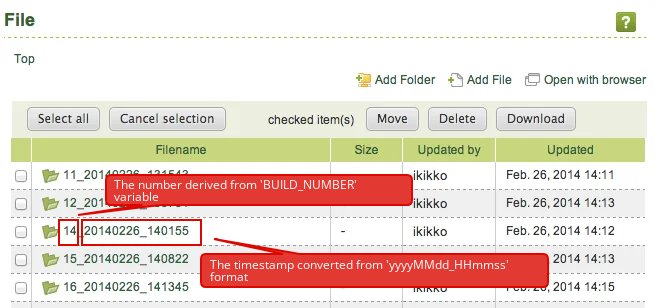
Result
Once you’ve configured the settings, you can then proceed to transfer artifacts. The result is shown below. As build number and date format are set, directories with each build are created.
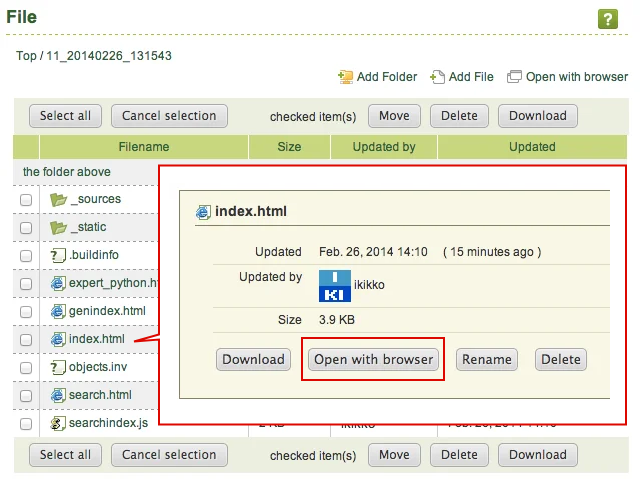
In the directory, there are HTML files generated by Sphinx. You view the HTML content on your web browser.
In this post, I have adopted HTML as an example artifact. You can use this configuration for other artifacts such as Android applications.

